Thursday, August 6, 2009

Short n Sweet Fingerless Mitts


Dress it up or dress it down. A little bit lace and a little bit traditional. Give your hands a treat and just enough warmth with these soft Alpaca & silk blend fingerless mitts.


Yarn: 2 skeins Elann Peruvian Baby Silk, 80% Alpaca/20% Silk, 25 gms/109 yards (100m), Aubergine #1805

Needle size: Size 2 US (2.75 mm) double pointed needles – set of 4 or 5

Notions: St markers, waste yarn, darning needle

Gauge: 7 sts and 10 rows = 1” over St st

Note: Be sure to check gauge. Not all fingering/ sock weight yarns are created equal.


ABBREVIATIONS

k - knit

p - purl

pm, sm, rm – place marker, slip marker, remove marker.

ssk = slip, slip, knit - slip 1 stitch, then slip the next; insert left needle into front loops of the slipped stitches, knit them together.

k2tog – knit 2 stitches together

yo – yarn over

slk2p – slip 1 st purlwise, k2tog, pass slipped st over

M1L = Make 1 Left slant – With left needle tip, lift strand between sts from front to back. Knit the lifted st through the back.

M1R = Make 1 Right slant – With left needle tip, lift strand between sts from back to front, Knit the lifted st through the front.


Cuff:

Cast on 52 stitches. Distribute sts between 3 needles (26-13-13). Join being careful not to twist the sts.

Rnds 1 & 2: Purl around.

Rnds 3 & 4: Knit around.

Rnd 5: (k1, yo) twice, k7, ssk, slk2p, k2tog, k7, yo, k1, yo, knit to end of round.

Rnds 6, 8, 10, 12, 14, 16, & 18: knit around

Rnd 7: k2, yo, k1, yo, k6, ssk, slk2p, k2tog, k6, yo, k1, yo, knit to end of round.

Rnd 9: k3, yo, k1, yo, k5, ssk, slk2p, k2tog, k5, yo, k1, yo, knit to end of round.

Rnd 11: k4, yo, k1, yo, k4, ssk, slk2p, k2tog, k4, yo, k1, yo, knit to end of round.

Rnd 13: k5, yo, k1, yo, k3, ssk, slk2p, k2tog, k3, yo, k1, yo, knit to end of round.

Rnd 15: k6, yo, k1, yo, k2, ssk, slk2p, k2tog, k2, yo, k1, yo, knit to end of round.

Rnd 17: k7, yo, k1, yo, k1, ssk, slk2p, k2tog, k1, yo, k1, yo, knit to end of round.

Rnd 19: k8, yo, k1, yo, ssk, slk2p, k2tog, yo, k1, yo, knit to end of round.

Rnds 20 thru 24: Knit around.


NOTE: If you would like a longer mitt, knit more rounds at this point, before starting the gusset set up


Thumb Gusset Set Up:

This mitt has a palm gusset, which is set up by separating all of the stitches that will be used for the thumb and making symmetrical increases to the hand as you work the glove body. Be sure to knit a left and right mitt.


Right Hand

Rnd 1: knit 20, M1R, pm, k18, pm, M1L, k14.

Rnd 2: Knit around.

Rnd 3: Knit to first marker, M1R, sm, k18, sm, M1L, knit to end of rnd.


Left Hand

Rnd 1: knit 6, pm, M1L, K34, M1R, pm, k12.

Rnd 2: Knit around.

Rnd 3: Knit to first marker, sm, M1L, knit to marker, M1R, sm, knit to end of rnd.

Repeat rnds 2 & 3 for both hands until you have 52 sts outside of markers. There will still be 18 sts between the markers.

Knit around for 2 more rounds.


Right Hand:

Next Rnd: Knit to marker, rm, place 18 thumb sts onto waste yarn, rm, join and knit to end of round.

Knit next round distributing sts on 3 ndls (26 - 13 - 13) or 4 ndls (13 – 13 – 13 – 13)


Left Hand:

Next Rnd: knit 6, sm, knit to second marker, rm, place 18 sts into waste yarn (next 12 sts and first 6 sts from next needle), rm.

Join and knit next rnd distributing sts on needles as for right hand.

Both Hands: Continue in stocking stitch (knit all rounds) for 11 more rnds.

Next Rnd: (k2tog, k24) twice. (50 sts total)


Finger Space Ribbing:

Rnds 1 & 3: *k3, p2; repeat from * around.

Rnd 2: *k1, yo, k2tog, p2; repeat from * around.

Rnd 4: *ssk, yo, k1, p2; repeat from * around.

Repeat Rnds 1 & 2 once more.

Next, *k3, p2; repeat from * around.

Bind off in k3, p2 rib.


Thumb

Place 18 sts from waste yarn onto 3 ndls (6 – 6 – 6).

Join yarn and k18. Pick up and knit 5 sts in the gap between the ndls. (23 sts)

Next Rnd: k18, k2tog, k1, ssk, (21 sts)

Next Rnd: Knit around.

Next: k17, k2tog, ssk (19 sts)

Next: k17, k2tog (18 sts)

Next: knit around.

For thumb ribbing:

Rnd 1: *p1, k2tog, yo; repeat from * around.

Rnd 2 & 4: *p1, k2; repeat from * around.

Rnd 3: *p1, yo, ssk; repeat from * around.

Bind off in p1, k2 rib.


Weave in all loose ends. Enjoy!


Pattern also available as a PDF download on Ravelry.

Thursday, September 25, 2008

Malabrigo Hand Thingies


Slipped stitches add dimension to these soft and comfy fingerless mitts.

Yarn: 1 skein Malabrigo Kettle Dyed Pure Merino Worsted Wool, 3.5 oz/216 yds, color of your choice. Color used: Autumn Forest 224
Needles: Set of 5 size 7 US (4.5mm) dpn’s
Notions: Waste yarn, st markers, blunt end needle
Gauge: 5 stitches = 1” in pattern stitch.

Abbreviations:
M1R
= Make 1 Right slant – With left needle tip, lift strand between sts from back to front, Knit the lifted st through the front.
M1L = Make 1 Left slant – With left needle tip, lift strand between sts from front to back. Knit the lifted st through the back.
K2tog = knit 2 stitches together
SSK = slip 2 stitches, 1 at a time, knitwise, and then knit the 2 sts together through the front.
Sl1 = Slip next stitch purlwise
K = knit
P = Purl

NOTE: All sl1 stitches will be slipped purlwise.

Cast on 32 sts using long tail method. Distribute sts evenly over 4 dpn’s. Join being careful not to twist stitches.

Rnds 1-2: Purl around.
Rnds 3-5: Knit around.
Rnds 6-7: Purl around..
Rnds 8-10: Knit around.
Rnds 11-12: Purl around.

Pattern Stitch:
Rnd 1: *K3, sl 1; repeat from * around.
Rnd 2: knit around.


HAND:
Knit rounds 1 & 2 of Pattern Stitch 10 times. (20 rnds total)

THUMB GUSSET:
You will be increasing 2 sts for the thumb gusset every third round while continuing the 2 round pattern stitch around.

Round 1: k1, place marker (pm), k1, pm, k1, sl 1, continue with rnd 1 of pattern st to end of round.
Rnd 2: k1, slip marker (sm), M1R, knit to marker, M1L, sm. Continue with rnd 2 of pattern st around.
Rnd 3: knit to 1st slipped st, sl 1, continue established pattern of k3, sl 1 around.
Rnd 4: knit around.
Rnd 5: k1, sm, M1R, k to marker, M1L, sm, k1, sl 1, cont with rnd 1 of pattern st to end of round.
Rnd 6: Knit around.
Rnd 7: Repeat rnd 3.
Rnd 8: Repeat rnd 2.
Rnd 9: Repeat rnd 3.
Rnd 10: Knit around.
Rnd 11: Repeat rnd 5.
Rnd 12: knit around.
Rnd 13: Repeat rnd 3.
Rnd 14: Repeat rnd 2.
Rnd 15: Repeat rnd 3.
Rnd 16: Knit around.

There should be 11 sts bet the markers.

FINGER AREA
Next rnd: k1, lift yarn bet 1st st and 1st marker and knit; place 11 thumb sts onto waste yarn, removing markers. Join with k1, sl1, cont with rnd 1 of pattern stitch around.
Next rnd: knit around.
Repeat rnds 1-2 of Pattern St 6 more times. (12 rnds total)
Bind off purlwise.

Thumb:
Place the 11 thumb sts from the waste yarn onto 3 dpn’s, [4 – 3 – 4]. Round 1: Join yarn and knit 11 sts on needles, pick up and knit 5 sts in thumbhole space (16 stitches total).Rnd 2: Knit 11 sts, ssk, k1, k2tog. (14 sts)
Rnds 3-7: knit around.
Bind off purlwise.

Weave in all loose ends. Fill in any gaps at the thumb base. Make second mitt as above.

This pattern is free for unlimited personal use. You may bookmark it, print it, copy and paste it. You can even make paper airplanes from your printed copy if you like. Just let people who are interested know where you got it.


This pattern is also available as a free Ravelry PDF download.

Tuesday, July 29, 2008

Fingerless Mitts Bookmark

It’s about time the Fingerless Mitt got its due in the mini-arena. They make a great bookmark, or use it to embellish gift wrap ribbon, or even as an ornament!

The multicolor and the emerald green were knit in the round. The emerald green is knit with cotton embroidery floss.


Yarn: Scraps of fingering weight (less than 6 yards)
Needles: For flat knit = 2 size 1 US (2.25 mm) straights or dpn’s;
For in the round = 4 size 1 US (2.25 mm) dpn’s
Extras: 2 stitch markers, large eye needle.
Size: Appx 3/4”W x 1 1/2”L (all fingering weights are not created equal)
Gauge: Not important.

Abbreviations:
K1fb = knit 1 through front of st, then knit 1 in back loop of same st. (increase made)
pm = place maker
sm = slip marker

For Flat 2 Needle Mitts:
Cast on 16 sts using size 1 needles with about 15-20” of yarn tail.

Row 1-4: K1, P1 across

Row 5: Knit 8, pm, lift yarn between 2 needles, place on left needle and k1fb, pm, k8
Row 6, 8 & 10: Purl across.
Row 7: k8, sm, (k1fb) twice, sm, k8
Row 9: k, sm, k1fb, k2, k1fb, sm, k8
Row 11: k8, bind off next 6 sts and remove markers, knit to end.
Row 12: Purl to thumb space, join and purl to end.
Row 13: Knit across
Row 14: Purl across
Rows 15 & 16: k1, p1 across.

Bind off in rib, leaving about 20” of yarn tail.

Fold in half with right side in; sew seam using yarn tail from bind off. Turn right side out and pull yarn tail ends to bottom of cuff. Twist together (like braiding with 2 strands) and tie a knot at the end. Or if you have a crochet hook and know how to use it, make a chain to finish off the bookmark!

For Mitts in the Round:
Cast on 16 sts using size 1 needles with about 20” of yarn tail.

Join, being careful not to twist sts. Distribute over 3 needles (4, 8, 4).
Rnds 1-4: K1, P1 around.

Rnd 5: Knit 8, pm, lift yarn bet 2 needles, place on left needle and k1fb, pm, knit to end.
Rnd 6, 8 & 10: Knit around.
Rnd 7: k8, sm, (k1fb) twice, sm, knit to end.
Rnd 9: k, sm, k1fb, k2, k1fb, sm, knit to end.
Rnd 11: k8, bind off next 6 sts and remove markers, knit to end.
Rnd 12: Knit to thumb space, join and knit to end.
Rnd 13 & 14: Knit around.
Rnds 15 & 16: k1, p1 around.

Bind off in rib, leaving about 20” of yarn tail.

Weave in yarn end at top through to the bottom rib. Twist the 2 yarn ends together (like braiding with 2 strands) and tie a knot at the end.
The pattern is also available as a Ravelry download.

Saturday, June 7, 2008

Always and Forever Fingerless Mitts


A simple pattern forms lace ribs allowing these mitts to fit a range of sizes. Knit in white as wedding gloves, they will look just as lovely in any color.

MATERIALS
Yarn: Patons Grace, 50 gm, 136 Yards/ 125 meters, 100% mercerized cotton, color of your choice.
Needles: Set of 4 Size 5 US (3.75mm) dpn
Stitch marker, tapestry needle
Gauge: 6 stitches = 1” unstretched.
Size: Will stretch to fit small to large hands.

Stitches used:
K
= knit
yo = yarn over
slk2po = slip 1, knit 2 tog, pass slipped stitch over.
M1L = Make 1 Left slant – With left needle tip, lift strand between sts from front to back. Knit the lifted st through the back.
M1R = Make 1 Right slant – With left needle tip, lift strand between sts from back to front, Knit the lifted st through the front.

Pattern Stitch
Rnd 1:
Knit
Rnd 2: *yo, k1, slk2po, k1, yo, k1; repeat from * around.

CUFF
Cast on 36 stitches, divide the stitches evenly on 3 dp needles (12 sts per needle). Join, being careful not to twist stitches.
Begin knitting rounds 1 & 2 of Pattern Stitch.

Repeat rounds 1 & 2 for 3“ (11 repeats of pattern st) or to desired length before start of thumb gusset, ending with rnd 1.

Thumb Gusset
Rnd 1:
at beg of rnd, pick up a st & knit, place marker; cont w rnd 2 of patt st to end of rnd.
Rnd 2: knit around
Rnd 3: M1R, knit sts before marker, M1L, slip marker, cont w pattern st to end.
Repeat rnds 2 & 3 until you have 15 sts for the thumb gusset.
Knit around 1 more time.

Finger Area
Place the 15 gusset stitches on waste yarn or st holder. Remove marker.
Next rnd: Join and continue to knit around starting with Rnd 2 of Pattern Stitch.
Repeat rnds 1 & 2 of Pattern Stotch 6 more times, or to desired length, ending with Rnd 1.

Bind off purlwise.

Thumb
Distribute the stitches from the waste yarn or holder onto 3 needles (6, 6, 3).
Round 1: Begin knitting across the needle with the first 6 sts (needle 1); knit the next 9 sts; pick up and knit 4 stitches in the thumb gap. (19 stitches total).
Rnd 2: Knit 15 sts, ssk, k2tog. (17 sts)
Rnds 3-5: knit around.
Bind off purlwise.

Weave in all loose ends. Fill in any thumb base gaps, if needed.
Make second mitt as above.


The pattern is also available as a free Ravelry download!

This pattern is free for unlimited personal use. You may bookmark it, print it, copy and paste it. You can even make paper airplanes from your printed copy if you like. Just let people who are interested know where you got it.

This pattern is copyright © 2008 to Anne Sahakian for NanoEffects

Jasmine Fingerless Mitts


Diamond brocade texture is achieved with a simple knit and purl pattern. Mini mock cable ribbed cuff and finger band complete these mitts.

MATERIALS:
Yarn: 1 skein Dale Baby Ull, 50g, 192 yards, color or your choice. Or any fingering weight yarn which gives gauge.
Needles: Set of Five Size #2 (3) double pointed needles.
Blunt needle, waste yarn or stitch holder, 1 stitch marker.
Gauge: 6.5 stitches = 1” with size 3 needles.
Size: Adult Small-Medium (Medium-Large)
*NOTE: Changing needle size to adjust sizing is preferable to increasing or decreasing stitches. Use size 2 needles for smaller size.

Abbreviations:
M1L = Make 1 Left slant – With left needle tip, lift strand between sts from front to back. Knit the lifted st through the back.
M1R = Make 1 Right slant – With left needle tip, lift strand between sts from back to front, Knit the lifted st through the front.
K2tog = knit 2 stitches together
K = knit
P = Purl

DIAMOND PATTERN STITCH
Rnd 1: *k3, p1, k2; repeat from * around.
Rnd 2: *k2, p1, k1, p1, k1; repeat from * around.
Rnd 3: * k1, p1, k3, p1; repeat from * around.
Rnd 4: * p1, k5; repeat from * around.
Rnd 5: * repeat round 3.
Rnd 6: Repeat round 2

CUFF
Cast on 48 stitches, divide the stitches evenly on 4 dp needles (12 sts per needle).
Join, being careful not to twist stitches, and begin knitting the mock mini cable ribbing as follows:
Rnd 1: *k2, p2, repeat from * around.
Rnd 2: *k2tog leaving loops on needle, then knit first st again, slip both sts off needle, p2; repeat from * around.
Rnd 3 & 4: repeat Rnd 1.
Repeat rnds 1-4 five more times, or to desired cuff length.

HAND
Knit rows 1-6 of Diamond Pattern Stitch one time.

THUMB GUSSET
Round 1: On needle #1- M1R, k1, M1L, place marker (there are 3 stitches in front of the marker). k1, m1, k1, p1, k2, cont knitting rnd 1 of pattern st from * 7x.
Rnd 2: knit sts before marker, continue to knit in next round of pattern st.
Rnd 3: M1R, knit to last st, M1L, sl m, (2 stitches increased), continue in next round of pattern st.
(You will be increasing 2 sts for thumb gusset on each odd number round and knitting thumb gusset sts on even rounds)

Repeat rnds 2 & 3 until there are 19 stitches for the gusset. (A total of 3 repeats of pattern st.)

FINGER AREA
Place the 19 gusset stitches on waste yarn or a st holder. Remove marker.
Next rnd: Join and continue to knit in stitch pattern starting with Rnd 1.
Next: Repeat rnds 2-6.
Repeat pattern st rnds 1-6 twice more.

FINGER SPACE RIBBING
Rnd 1: *k2tog leaving loops on needle, then knit first st again, slip both sts off needle, p2; repeat from * around.
Rnds 2, 3 & 4: k2, p2.
Rnd 5: Repeat rnd 1.
Bind off in k2, p2 rib.

THUMB
Distribute the stitches from the waste yarn or holder onto 3 needles [8, 8, 3.]
Round 1: begin knitting across the needle with the first 8 sts (needle 1); knit the next 11 sts; pick up and knit 5 stitches in the thumb gap. (24 stitches total).Rnd 2: Knit 19 sts, ssk, k1, k2tog. (22 sts)
Rnds 3-8: knit around.
Bind off purlwise.

Weave in all loose ends. Fill in any gaps at the thumb base. Make second mitt as above.

This pattern is also available as a free Ravelry download.

This pattern is free for unlimited personal use. You may bookmark it, print it, copy and paste it. You can even make paper airplanes from your printed copy if you like. Just let people who are interested know where you got it. ­

Monday, May 5, 2008

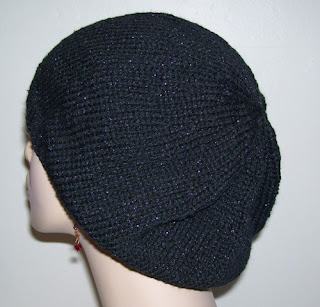
GLITTERSPUN SLOUCH HAT


This is a fairly basic slouchy hat knit with Lion Brand Glitterspun, which gives it just enough glitz. It can be knit in a plain worsted weight yarn as well, and be just as pretty.

Materials:
Lion Brand Glitterspun – 115 yards/50g - 2 skeins black or your color choice
Tapestry needle
Stitch marker.
Needles: 16” circular needles – size 5 US (3.5mm) & 9 US (5.5mm); Set of 4 size 9 (5.5mm) dpn’s
Size: One Size
Gauge: 5 sts = 1” using size 9 (5.5mm) needles

Abbreviations:
k – knit
p – purl
k2tog – knit 2 together
m1 – make 1 = lift strand between 2 sts on needles from front, k through back.

Directions:
With size 5 circular needles, cast on 92 stitches. Join being careful not to twist the stitches. Place a marker to indicate start of new round.

Rnd 1-8: k2 p2 around.
Rnd 9: Change to sz 9 circulars and *k2, m1, repeat from * to marker. (138 stitches)

Continue to knit around until you’ve knit about 5 1/2”.
(Change to dpn’s when needed.)
Decrease round: *k4, k2tog, repeat from * to marker. (115 st)
Knit 4 rounds.
Next dec round: *k3 k2tog, repeat around to marker. (92 st)
Knit 4 rounds.
Next dec round: k1, k2tog, *k2, k2 tog, repeat from * to last st, k1. (69 st)
Knit 3 rounds.
Next dec round: *k1 k2tog, repeat around to marker. (46 st)
Knit 2 rounds.
Next dec round: k2tog to marker. (23 st)
Knit 2 more rounds.

Cut yarn leaving about 8-10” of length to run yarn through remaining loops on needles. Pull tightly and secure. Weave in ends.

Embellish with a crochet or knit flower or object of your choice.


This pattern is free for unlimited personal use. You may bookmark it, print it, copy and paste it. You can even make paper airplanes from your printed copy if you like. Just let people who are interested know where you got it.

Wednesday, March 12, 2008

STRIPEY SLOUCHY BERET


This hat is not typical in its “beret” appearance, but the fullness is flattering for many face shapes. The ribbing has enough stretch to fit most adult head sizes.

Materials:
Knit Picks Swish 100% Superwash Wool – 110 yards/50g - 2 skeins black (mc)
Knit Picks Bare Worsted 100% Superwash wool – 220 yards/100g – 1 skein bare (cc)
Or any worsted weight yarn in your color choice.
Tapestry needle
Stitch marker.
Needles: 16” circular needles – size 5 US (3.5mm) & 7 US (4.5mm); Set of 4 size 7 (4.5mm) dpn’s
Size: One Size – Ribbing 15”, relaxed. Hat measures appx 23” around.
Gauge: 19½ sts + 24 rows = 4” square
Abbreviations:
k
– knit
p – purl
k2tog – knit 2 together
m1 – make 1 = lift strand between 2 sts on needles from front, k through back.
mc – master color
cc – contrast color

Directions:
With size 5 circular needles, cast on 92 stitches in black (mc). Join being careful not to twist the stitches. Place a marker to indicate start of new round.

Rnd 1-8: k2 p2 around.
Rnd 9: Change to sz 7 circulars and continue with black (mc), *k2, m1, repeat from * to marker. (138 stitches)
Rnd 10: Change to bare (cc) and knit around once.
Rnd 11 & 12: Change to mc and knit around. (carry yarn at the join throughout)

Repeat rnds 10-12 until you’ve knit about 5 1/2” ending with rnd 12 in mc.
(Change to dpn’s when needed.)
Decrease round: In cc *k4, k2tog, repeat from * to marker. (115 st)
Knit next 5 rounds in color sequence (2 mc, 1 cc, 2 mc)
Next dec round: In cc, k3 k2tog, repeat around to marker. (92 st)
Knit next 5 rounds in color sequence (2 mc, 1 cc, 2 mc)
Next dec round: In cc, k1, k2tog, *k2, k2 tog, repeat from * to last st, k1. (69 st)
Knit 2 rounds in mc.
Next dec round: In cc, k1 k2tog, repeat around to marker. (46 st)
Knit 2 rounds in mc.
Next dec round: In cc, k2tog to marker. (23 st)
Knit 2 more rounds in mc.

Cut ends of yarn leaving enough mc to run yarn through remaining loops on needles. Pull tightly and secure. Weave in ends.


This pattern is free for unlimited personal use. You may bookmark it, print it, copy and paste it. You can even make paper airplanes from your printed copy if you like. Just let people who are interested know where you got it. ­